
✨ sticky nodes: a simple to-do📝 list app ✨
a simple to-do list app created with react, auth0 and hasura's graphql engine


⛅ why a to-do app?
This is my very first article for hashnode (and first technical article in general !) in my learning journey as a backend dev and i'm so excited to finally publish it. I built this app to participate in the Hasura hackathon but also because keeping track of tasks is something i struggle with daily. I get distracted quite easily so being able to visualize my goals for the day and divide them up into smaller pieces (nodes lol) is very helpful. Sure there are so many to-do apps out there but I also wanted to challenge myself to build one and have fun with it. Like I said, I am primarily a back-end dev so it was fun to work with React components to bring the app to life.
👷🏾♀️ how i built the app
💡 requirements
I knew I wanted to use React for the front-end as I didn’t want users (or myself lol) to have to visit too many pages to add/edit their sticky nodes. For my database I decided to try my hand at Hasura’s GraphQL Engine and it was honestly such a seamless experience that i will expand further on later.
🛠 tech stack:
- React + Node Js
- Tailwind CSS
- Hasura GraphQL Engine
- Auth0 (for authentication)
- Heroku (for deployment)
⏰ auth0 + hasura engine
In this article I’m going to focus more on breaking down how i authenticated the app using Auth0 and implemented the database using Hasura. When I decided to build a to-do app I knew I would have to think of a way to authenticate users, since it would be structured in a way that a user can only access their own notes. To do this I started out by visiting Auth0's dashboard here and creating + configuring a new application.
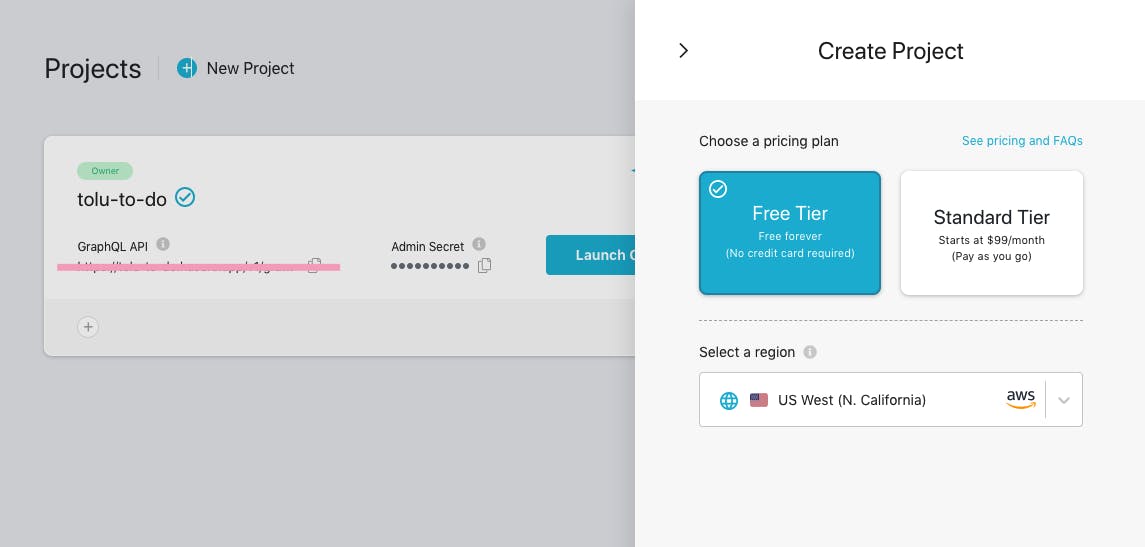
After that I headed over to Hasura Cloud to create my project and get access to the GraphQL engine.
So what exactly is this Hasura GraphQL engine? Simply put:
The Hasura GraphQL engine makes your data instantly accessible over a real-time GraphQL API, so you can build and ship modern apps and APIs faster. Hasura connects to your databases, REST servers, GraphQL servers, and third party APIs to provide a unified real-time GraphQL API across all your data sources.
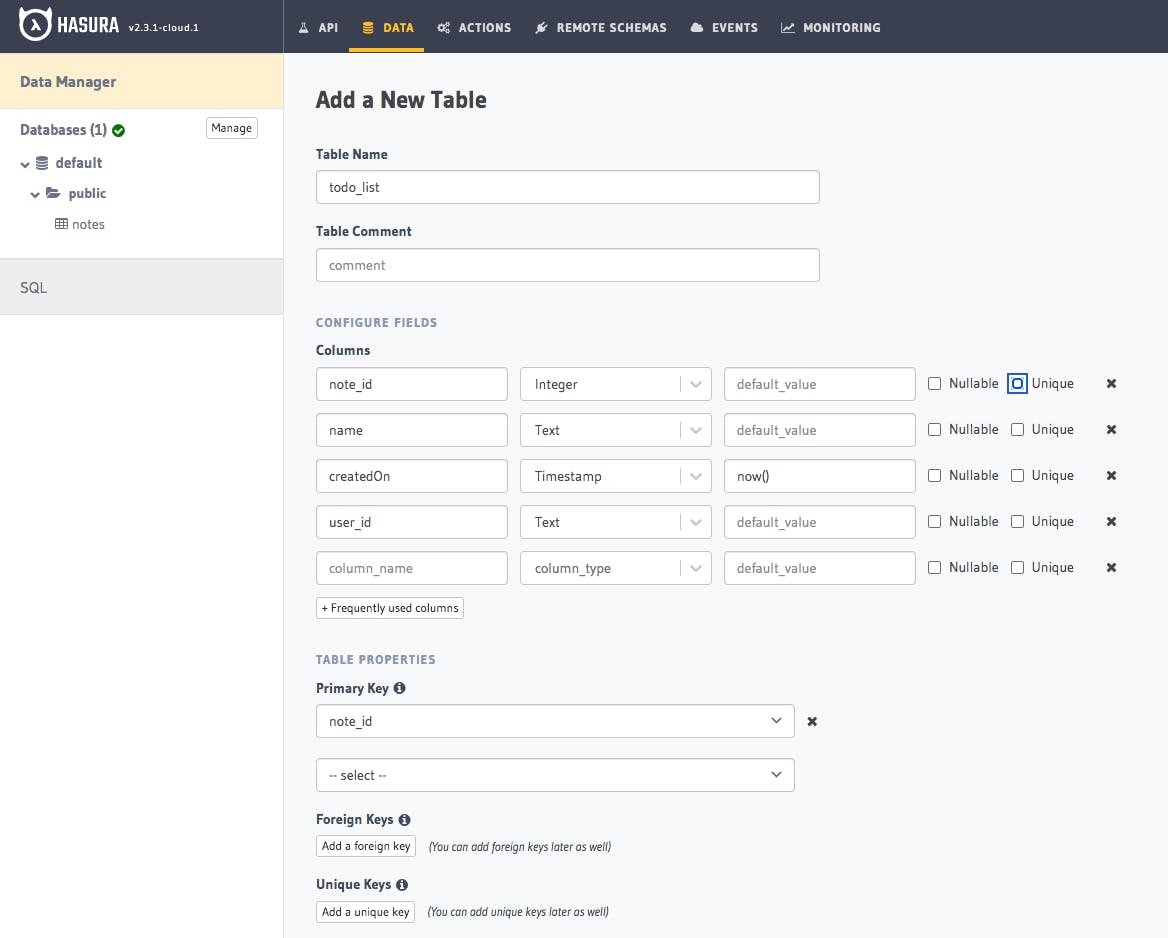
After creating the project, I clicked on Launch Console which opens up the Data Manager. You can either connect an existing Database or create a (free) one that sits on Heroku. I chose to connect an existing Postgres DB. Hasura also connects to Postgres databases and gives Instant Realtime GraphQL APIs.
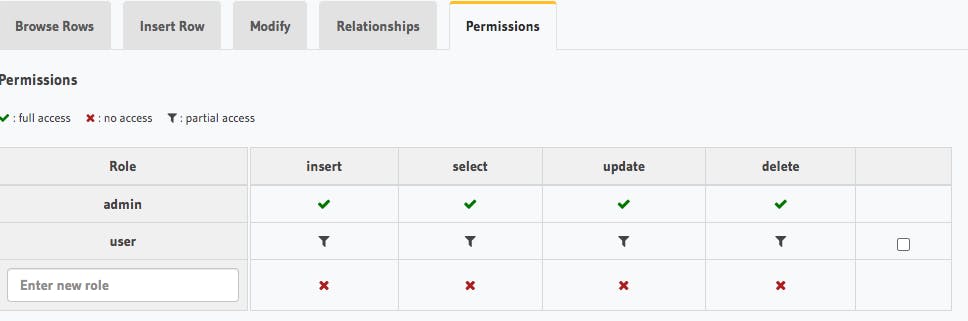
The process to create a table and its fields in the database is a straightforward one from there and it also gives you the ability to set permissions for the users. I gave my users the Permissions to : insert, select, update and delete their own notes by setting up custom checks for user_id.
📊 grapql + react js
Unlike REST APIs which would typically gather data by accessing multiple endpoints, GraphQL uses a fixed endpoint. The structure of the data returned is flexible and the client can decide exactly what data is needed. You'd simply send a single query to the GraphQL server that includes the data requirements. The server then responds with a JSON object where these requirements are fulfilled. In addition to Queries, you can also send Mutations to the server, namely: Insert, Update and Delete Mutations.
For the to-do list application I wanted to be able to query the database as well as send the insert and delete mutations (to add/delete sticky notes). To connect my Hasura GraphQL API to my React App I installed Apollo Client by running npm install @apollo/client graphql --save. Apollo Client is a state management library that allows you manage both local and remote data with GraphQL. After that I created a queries folder inside of src. In that folder I then created an index.js file with the following queries and mutations:
//query to add a note

import { gql } from "@apollo/client";

//function created to create/modify the data in db and return some values
//insert_notes 'insert' is a prefix for table 'notes' graphql syntax
export const insertNoteMutation = gql`
  mutation ($name: String!, $user_id: String!) {
    insert_notes(objects: {name: $name, user_id: $user_id}) {
      returning {
        note_id
        name,
        user_id
      }
    }
  }
`;

//function for gql query to get all notes using specified variables
export const getNotesQuery = gql`
query {
  notes(order_by: { createdOn: desc }) {
    note_id
    name
    user_id
  }
}
`;

//function for gql mutation query to delete a note i.e remove specified data in db
export const deleteNoteMutation = gql`
mutation($note_id: Int!) {
  delete_notes_by_pk (note_id: $note_id) {
    note_id
    name
    user_id
  }
}
`;
The functions are then imported by the specific components
that need them in order to add functionality to the app. In the components folder there are: addNote.jsx, getNotes.jsx (to get a list of all the notes) and a Header.js. The addNote.jsx looks like this:
import React, { useState } from "react";
import { useMutation } from "@apollo/client";
import { useAuth0 } from "@auth0/auth0-react";
import { insertNoteMutation, getNotesQuery} from "../../queries";
export default function CreateNote() {
const [insertNote, {loading, error }] = useMutation(insertNoteMutation);
const [name, setName] = useState("");
const { user, isAuthenticated } = useAuth0();
if (!isAuthenticated) return <></>;
const handleSubmit = (e) => {
e.preventDefault();
insertNote({
variables: { name: name, user_id: user.sub },
refetchQueries: [{ query: getNotesQuery }],
}).then(() => {
setName("");
});
};
if (loading) return <p className="load">Loading ...</p>;
return (
<>
<div className="mb-4">
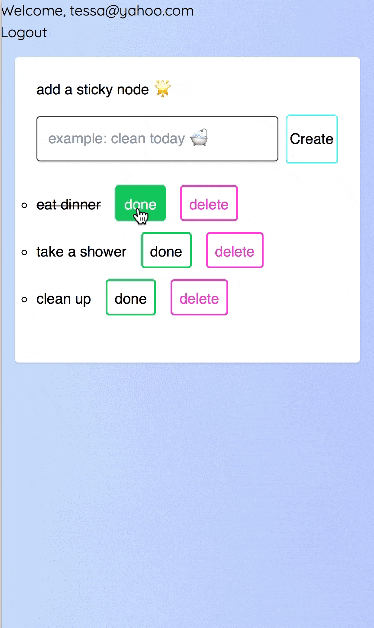
<h1 className="text-grey-darkest">add a sticky node 🌟 </h1>
<form onSubmit={handleSubmit}>
<div className="flex mt-4">
<input className="shadow appearance-none border rounded w-full py-2 px-3 mr-4 text-grey-darker" placeholder="example: clean today 🛁" type="text"
value={name}
onChange={e => setName(e.target.value)}
required/>
{error && <pre>{JSON.stringify(error)}</pre>}
<button className="flex-no-shrink p-1 border mb-2 ml-2 rounded text-black border-teal hover:text-white hover:bg-teal" type="submit" value="Add"> {loading ? "Creating" : "Create"}</button>
</div>
</form>
</div>
</>
);
};
There's some authentication going on there with the auth0 package as well as the insertNoteMutation being used to insert whatever values are passed from the form to the CreateNote function. The getNotesQuery is then used to refresh the list of sticky notes after a new one is inserted. The getNotes.jsx component looks like this:
import React from "react";
import { useAuth0 } from "@auth0/auth0-react";
import { getNotesQuery,deleteNoteMutation } from "../../queries/index";
import { useQuery, useMutation } from "@apollo/client";
import { toast } from "react-toastify";

export default function GetNotes(props) {
    const [deleteNote] = useMutation(deleteNoteMutation);
    const { error, loading, data }
        = useQuery(getNotesQuery)
    const { isAuthenticated } = useAuth0();
    if (!isAuthenticated) return <></>;
    if (loading) {
        return <p className="load">Loading...</p>;

    }
    if (error) {
        return toast.error("An error occured!");
    }

 const deleteNoteId = (note_id,name) => {
    deleteNote({
      variables: { note_id: note_id, name: name },
      refetchQueries: [{ query: getNotesQuery }],
    }).then(() => alert("Deleted"));
  };

  const markItemAsDone= (id) => {
    var whenClicked = document.getElementById(id);
    whenClicked.addEventListener('click', function(){
    this.className = "finished";
  })
};

    return (
    <div className="flex mb-4 items-center">
        <ul className="list-items">
        {data.notes.map((item) => (
        <li id={item.note_id}className="w-full text-grey-darkest" key={item.note_id}> {item.name}
        <button id="myFinished" onClick={() => markItemAsDone(item.note_id)}className="shrink w-15 h-10 p-2 mr-4 ml-4 border-2 rounded hover:text-white border-green hover:bg-green">done </button>
        <button onClick={() => deleteNoteId(item.note_id)} className="shrink w-15 h-10 p-2 mb-3  border-2 rounded text-red border-red hover:text-white hover:bg-red">delete</button>
        </li>
        ))}
        </ul>
    </div>
    );
        };
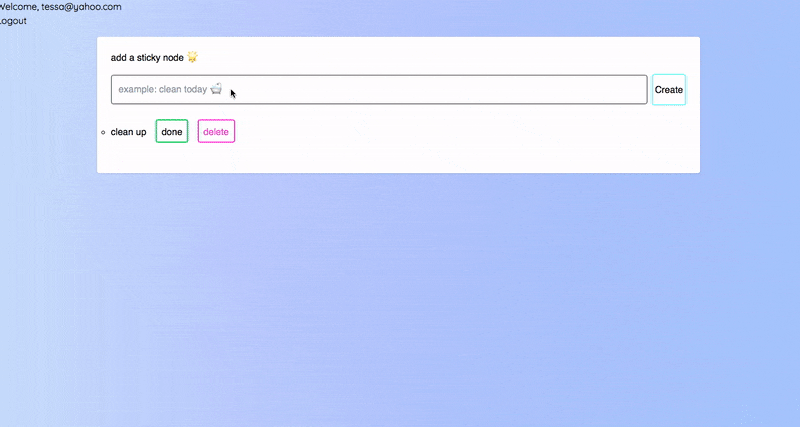
It's very similar to the addNotes.jsx file with the addition of the deleteNoteMutation being used by the function deleteNote to delete notes with matching values from the database. It also has an extra function to add an EventListener to the 'done' button. It allows users to strikethrough (add a line) completed tasks like so:
🌈 what did i learn?
This is only about my fourth React project so I'm still getting the hang of it but I learned a lot about:
ApolloClient: Most of the articles I read about using Hasura with React mentioned using it but I had no idea what it actually did until I read their (very in-depth) documentation here.Heroku Deployment: Deploying this app was quite a challenge as I'd only ever used Heroku to deploy a Django app. Deploying a React app is a bit different and I had to make some configurations such as adding the following lines to thepackage.jsonfile:
"scripts": {
...
"heroku-postbuild": "npm run build"
}
💖 thanks
I was so nervous writing this article but I'm really glad I did and I hope someone finds this useful!
Feel free to connect with me on Twitter and let me know your thoughts on this project.